Tampilkan postingan dengan label Tips and Tricks. Tampilkan semua postingan

Selasa, 09 Oktober 2012

Freezer Paper Pattern

Have you ever needed to make your own pattern, but it wouldn’t fit on plain old printer paper?

I have.

I use freezer paper instead.

Use freezer paper as pattern paper

Let’s say you’re making up a pattern for toddler sized underwear.

What?  You don’t make your kids’ undies?

Umm…me neither.  I just did the one time.  I still don’t know if I’ll show off that tutorial.  You might think I’m a tad cray-cray.

Okay, so you need a pattern. 

Find whatever you’ll need to base your pattern piece off of.

For me, it was the bottom half of a Onesie.

Use freezer paper as pattern paper (3)

Line it up and trace around it.

Use freezer paper as pattern paper (5)

Write your instructions on it, but only if you want to.

Use freezer paper as pattern paper (6)

Cut it out and you’re done!

You know how store bought patterns are made out of tissue paper?  Sometimes the pieces tear.  I have several patterns that I have retraced onto freezer paper.

You know how some patterns have several sizes?  I have a few pajama pants patterns and have needed all the sizes.  I have five boys, remember.  They aren’t all the same size.  Rather than cut the pattern piece one size, I use freezer paper.

I start off with the biggest size and trace it onto the freezer paper.  Then, I work my way down so that I have several different sizes; not just one flimsy piece of tissue paper with the markings for all the different sizes.

Want to know another little trick?  You can also use the back side of old Christmas wrapping paper, brown craft paper, and even newspaper.

Anyway…just a tip!  :)

signature nat

READ MORE - Freezer Paper Pattern

Selasa, 11 September 2012

Shirring Shortcut

Hey!  Go enter the link party and get ready for another one on Saturday!  We’ll do the What I Wore Sunday link party every Saturday, so go spend some quality time with your sewing machine and show us your creations!
*****
I like to shirr.  So does Ash.  Do you?
Look at all of these fun shirred things we’ve made:
So, yeah.  Shirring is fun.  You know how you have to wind the bobbin by hand?  That can be kinda time consuming.  Well, I found a shortcut.
Get your elastic thread and put it onto your sewing machine like you’re going to wind your bobbin.  Only don’t thread it.  Wrap the elastic thread around your thumb, then wrap it around the bobbin winder.  S-L-O-W-L-Y wind your bobbin so that you’re not stretching the elastic.
Shirred infant flower girl dress from the Crafty Cousins (4)
See how fast and easy?  If you have a big shirring project, wind several bobbins before you start.  It saves time later.
I had a big shirring project, and I wound about 10 bobbins for it.  I’ll show you that project later. 
Are you dying to know what it is?
I’ll give you a hint:
It has something to do with this silk flower bouquet I made:
 P1070799
P1070798
(Which was super easy, btw.  All I did was get a little bouquet holder from Hobby Lobby, some silk roses and stephanotises, trim the ends, and poke them into the foam thing in at the top, wrapped the handle in white ribbon, tied a bow…)
Back to the hint:
It also has something to do with this wedding veil I made:
wedding veil
Check back on Thursday to find out what it was!
Oh, and guess what I’m doing tonight?  I’m teaching a class on refashioning to a bunch of ladies at my Church.  We’re having a “Refashion Show.”  I bought as much as I could for $20.00 at the thrift store and gave an article of clothing to several different people to refashion.  I can’t wait to see what they came up with.
I’ll post about that soon, too!  :)
signature nat
READ MORE - Shirring Shortcut

Rabu, 15 Agustus 2012

This little piggy…helped with chores?

Psst...Did you hear we're finally on Facebook? Come join the fun over there!
Maybe having a toddler ask for EVERYTHING at the store, or not wanting to pick up toys, or throwing fits when asked for 300+ time to do something sounds familiar? Well, I was getting tired of it, so I combined a bunch of ideas from Pinterest and came up with a solution, that so far (knock on wood) is working. First off, we had a family meeting to decide on family rules. The kidlets helped come up with them. I printed them up and put them in a thrifted frame.
Chores (2)
Then, I came up with chores/jobs that I expect them to do every day, and some extra jobs they can do at their age.
Chores (3)
I printed it up, and put it in a matching thrifted frame, and used washi tape to add a little bit of interest to it. Nothing too special, just simple for us. These frames came from the DI with Velcro on the back, so I used these Velcro strips from 3M. So far, I like them.
Chores (5)
And hung them where all the family could see them, but it’s not the first thing other people see.
Chores (4)
Next, I got a bunch of glass jars (does anyone else save them? No? Well here’s proof to my honey it's not just another hoard) I let the girls pick their colors from my acrylic paints (purple and pink, is anyone really surprised?) and made a few different jars. The first has a chalkboard label and a slit in the top (made a little safer with washi tape) for them to put their tithing in.
Chores (8)
The next was just too freakin cute. I saw the idea on Pinterest and just changed it a bit. I cut out vinyl for their first letter of their name, and added cereal box ears, wooden bead legs, pipe cleaner tails, and washi tape snouts.
Chores (1)
How adorable are those?!? They don’t have a slit in the top, so they just unscrew the snout to put their money in to save.
Chores (6)
Now, all of my hubby’s and mine loose change goes in this jar. I used vinyl and a Cricut to cut out a mustache (from my mom’s cartridge she designed. She’s pretty awesome. It’s called Paper Doll Dress Up), and added the words “my stache” Hee hee, makes me smile whenever I see it Smile
Chores (7)
Finally, I got some empty Crystal Light containers, cut slits in the top, and added vinyl with their initial and the words “chore $”. Whenever they do things from the list, they get so much for doing the everyday jobs, and a little bit more for doing the extra jobs. I give them their change as soon as they do the job (from my mustache jar), and then they get to put it in their chore jar. If I have to ask them multiple times to do something, and/or end up doing it myself, they have to pay me the same amount. At the end of the week, we count their money and put some in tithing and the rest in the piggy bank. So far, my oldest has appreciated having a way to get money, and I’m sure once she’s able to buy her first thing, it will come together even more! Chores (9) copy
READ MORE - This little piggy…helped with chores?

Rabu, 08 Agustus 2012

Hot Tamales!

So already twice this summer (actually in the past month if you want to know the truth) I’ve made tamales. People are pretty intimidated by it, but it’s not as bad as it seems. I found a link a few years ago that I use every time and they are really the best tamales I’ve had. They are good with or without a sauce, and just tend to have a lot of flavor! Ready for it?
Making Tamales (12)

I’m not going to give you the recipe, because this guy over here at Son of the South is the recipe I use. I’ll just show you more pictures and tips than he gives. I took the pictures the first time I was making them this summer. One thing I’ll tell you upfront is it takes time!! I spread it out, but it still takes 2 hour chunks of time, just warning you. So I’ll tell you the way I break it up and you can give it a try if you want.

First, you have to get all your ingredients. He tells you everything here. One tip is if you see chicken or pork on a great sale, grab a 4-5 lb. roast, and 4-5 lb. of chicken. You can cook the meat whenever, season it, and then freeze it until you’re ready to do the tamales. I have a gallon freezer bag with a ton more meat in it right now that I’ll use for quesadillas, tamales, tacos, and other such stuff. It’s really yummy! So you can just dump them into a crock pot, or boil them on the stove (for 2 hours). I’ve done both. Cook them separately though (by the way, if you don’t want pork or chicken, or want to try roast beef, do whatever you want! My hubby wants to try some with shrimp next time…we’ll see!) After it’s all cooked, take a tip from Pinterest and shred it this way:

Making Tamales (4)

One thing he tells you multiple times is save your broth! So I just dump it in quart jars and keep it in the fridge until I need it.

Making Tamales (7)

You want it shredded nice and fine. Pull out any chunks of fat or gross stuff when you can.

Making Tamales (3)

Dump it in a big bowl,

Making Tamales (2)

and warm up the seasonings. (by the way, sometimes I’ll cook the meat on laundry day, and then do the seasoning and shredding the next day,and freeze it till I’m ready to make the tamales!)

Making Tamales (6)

I wish you could smell this through the computer. Oh, it’s heavenly!!! Of course I have a MAJOR love affair with cumin. Oh man. If there were a Scentsy thing for that, I’d be all over it. Then you need to mix up your corn meal, or Maseca, with the seasonings, broth and oil, while you soak your corn husks.

Making Tamales (9)

These have to soak for 2 hours (that’s the key number in all of this). I actually put a heavy bowl on top to keep them all in the water, but moved it for the picture. By the way, you can typically find the corn husks and Maseca in the Hispanic section, or in your produce aisle. For locals, I haven’t found corn husks at Associated Food stores, but they’re at Smith’s. I don’t know about Wal-Mart.

Making Tamales (8)

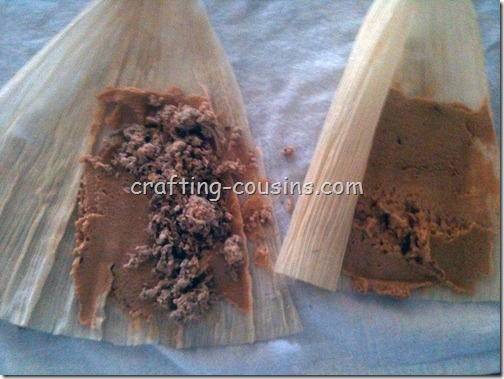
Now, you’ve got everything you need to get tamale making! Lay out as many corn husks as you can on your towel on the counter (to soak up the wetness), and spread Maseca on it. I’ve used my fingers (clean, of course!), a butter knife, and an offset spatula. I like the spatula best.

Making Tamales (10)

Spread 'em all out, then put your meat on
Making Tamales (11)

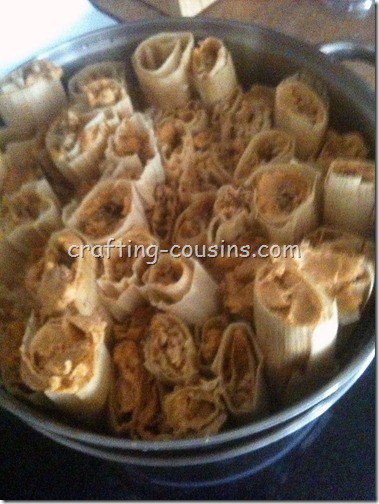
Then, roll ‘em up nice and tight, and stick them in your tamale steamer, upright.

Making Tamales (1)

This is my DI find that I was super excited to find last summer. 75 cents baby! (It didn’t have a lid, but luckily one of my pots had one) I’ve also seen them at Winco during fall/Thanksgiving season, but I didn’t grab one fast enough. But, I made them multiple times before I had it with a lot of pots, metal strainers, and even my rice cooker. The main thing is you can’t have the tamales directly in the water, and they need to be covered, and should be upright (but I couldn’t always do that). Then, you put them in your pot, put the lid on, and steam them for….wait for it….2 hours. I typically get about 60 tamales per batch, so I freeze enough for a meal in Ziploc bags and reheat them by steaming or the microwave when we need a quick meal.

Making Tamales (12) copy

So yummy! Who wants to come over and have some tamales?!

READ MORE - Hot Tamales!

Selasa, 31 Juli 2012

Another Use for Bent-Tip Serging Tweezers

Have you entered the giveaway yet?!  No?!  Well, I'll wait here while you do.
...waiting...
...waiting...
...waiting...
Back already?  Awesome!  I hope you win!  :)

Do you have any bent tip serging tweezers? 
11zlCzKnaOL
They come in handy with the sewing machine, too.
Well, I've recently come up with another use for these bad boys.
Monkey got one of these Legos stuck up his nose.
$T2eC16ZHJHQE9nzEy8GmBP85mPVJ !~~60_57
Why?  Because he’s two.
The removal of this Lego was a team effort.  I held Monkey down (while we both cried…) The Hubsters performed the procedure, and the tweezers did an excellent job with the extraction.
We avoided a trip to the ER, and Monkey’s nose is now Lego free.
Thank Heaven.
I hope you never need this tutorial, but at least it makes a funny story--now that it’s over!  :)
Oh, and in case you were wondering, Monkey’s Lego was orange. 
:)
signature nat
READ MORE - Another Use for Bent-Tip Serging Tweezers

Senin, 30 Juli 2012

They were cones!

So there’s something I’ve wanted for my sewing machine for a LONG time. Like, every birthday and Christmas I give the idea to my husband to see if this will be the year. So, this weekend, I just decided to take matters into my own hands. It’s not pretty, but it works. After I finished it, hubby said he would make me “a cool one.” and I said I didn’t care cuz I just wanted one that works. So what was it you ask? Well, let’s say you’re like me, and don’t want to buy little spools of white thread, so you get the serger cone. And this is how it sits on the machine.

Serger Cone DIY (2)

And let’s say you got lectured the last time you got your machine serviced by the guy who did it that it ruins tension, and doesn’t make a nice stitch.

Serger Cone DIY (3)

So, I made my serger cone holder thing. Technical term. Really, Google it. Anyway, I got me a wire hanger No more wire hangers! And I measured how tall I wanted it on my machine and snipped it with wire cutters.

Serger Cone DIY (4)

I did mine as tall as the spool holder there. Give or take. Then, cut it so you’ve got about 2 inches extra on the other end. Like so.

Serger Cone DIY (5)

And then form a loop shape. Like so.

Serger Cone DIY (7)

Then, get a piece of scrap wood. Mine was about 3/4” wide, and about 3”x4”. Drill some holes in it for your hanger and dowel.

Serger Cone DIY (9)

What’s that? You don’t have a dowel? I didn’t either. Ready for it?

Serger Cone DIY (10)

Oh, isn’t it pretty? Like I said, it’s totally utilitarian. I don’t care. I may paint it just because I can. It works.

Serger Cone DIY (11)

Totally awesome pencil sticking out.

Serger Cone DIY (12)

See? A lovely back shot of my machine.

Serger Cone DIY (1)

Oh, it works! Don’t mind my cluttered table. I’m working on 30 projects in my head, so I should have some cool stuff soon. I’ll be back Wednesday with a fun post! Want a sneak peek? Here ya go!

Serger Cone DIY (8)

Happy Monday.

READ MORE - They were cones!

Kamis, 12 Juli 2012

Travel Tips and Tricks

I just spent a few days at Girls Camp, and now we’re on the road again.
Guess where we are?
I’ll give you a few hints:
448px-YellowstonefallJUN05
800px-Old_Faithful_Geyser_Yellowstone_National_Park
gallery_37
Anyone who guesses right gets a gold star!
We’ll be back from our vacation next week.  We just spent 10+ hours in the car with five kids.  Before we left, I searched Pinterest for ways to keep the kidlets happy.  These are a few of the best ideas I found:
Source: superjenn.com via Nat on Pinterest

Hopefully all of these tips made our road trip a bit easier.  I’ll let you know how it went when I get back!
See you soon!
signature nat
READ MORE - Travel Tips and Tricks